THE POLLEN CORONA
Coronas are colorful halos around the sun or moon. They are generally caused by ice crystals or water droplets. Under special conditions, they may also be formed by pollen. Since 1997 I have observed, measured and photographed coronas caused by pollen from juniper trees (Juniperus asheii) in the Texas Hill Country. They appear only a few times each winter at most and are visible only on clear days near noon. I have described pollen coronas in "Solar corona caused by juniper pollen in Texas," Applied Optics 37, 1486-1488, 20 March 1998.

This image of a particularly brilliant and long-lived pollen corona was photographed on 7 January 2007.
CAUTION: Never view a pollen corona by looking at the sun directly or through the viewfinder of a camera! A pollen corona must be observed only with utmost care, for directly viewing the sun can cause serious and permanent eye damage. It is essential to wear dark sunglasses, but even they will not fully protect your eyes from direct sunlight. Therefore, the solar disk must be completely concealed behind a roof or other large object. (The fence post shown above does not provide safe viewing and is good only for photographing a pollen corona by pointing a camera toward the corona as described below.) The sky away from the sun must be viewed with great caution. The safest way to view a pollen corona is to simply look at the image above. Never attempt to photograph a pollen corona while looking through a camera viewfinder.
The pollen corona shown above was photographed using the method I described in "Solar aureoles caused by dust, smoke and haze," Applied Optics 42, 492-496, 2003. The method is described here:
Aureole Photography Techniques
The light of the direct Sun is so intense that photographs of the Sun do not show the solar aureole unless the aureole extends across a substantial portion of the camera’s field of view (FOV). Proper aureole photography requires that the solar disk be occluded.
The solar aureoles presented in popular books are often photographed with an object such as a street light or flag pole interposed before the solar disk. This method works well when an appropriate object is available, which is often not the case. Moreover, it can be hazardous for one’s eyes to make aureole photographs in this fashion. That is because it is difficult to frame the photograph without inadvertently looking at a portion of the solar disk.
For serious aureole photography, a simple handheld occlusion device is the preferred way to block the direct solar disk. This method has the added safety advantage of not requiring the photographer to peer through the camera’s viewfinder when the camera is being pointed toward the Sun. A very simple but effective occlusion device can be made by mounting a spherical ball or disk on the end of a thin rod or stiff piano wire. Both the ball or disk and the support rod should be painted flat black. The ball or disk should have a diameter slightly larger than that of the camera’s lens.
To make a solar aureole photograph, the camera is placed on a flat surface and tilted toward the Sun until sunlight passing through the viewfinder forms a bright spot of light on the surface below and behind the camera. The spot of light will be surrounded by the camera’s shadow.
[CAUTION: NEVER VIEW A POLLEN CORONA DIRECTLY OR BY LOOKING THROUGH THE VIEWFINDER OF A CAMERA.]
The camera is then aligned until the spot of light is approximately coaxial with that portion of the shadow that approximates its actual location. The camera is then held in place by one hand with a finger over the shutter button. The occluding device is then held 10 cm or more from the camera until its shadow falls directly over the camera’s lens. The shutter button is then pressed.
After some practice, this method of aureole photography will yield excellent aureole photographs. The photographs will be even more desirable if the photographer’s fingers and hat do not appear in the finished images. While a literature search did not disclose a description of this method, the principle is so obvious that it is probably known to other aureole photographers.
Manually holding the shadow disk or ball in place while also making sure the camera does not move can be somewhat tedious. An alternative method of blocking the Sun is to mount both the camera and the occluding device on a common platform with a backboard on which the camera’s shadow will fall when the apparatus is pointed toward the Sun. The shadow device should be mounted coaxially with respect to the lens and at least 10 cm away from the lens. The apparatus is aligned with respect to the Sun by tilting it until the spot of sunlight is aligned as described above.
These methods work well with fixed focus cameras and automatic cameras with a lens that can be set for infinity. Cameras with autofocus lenses should be set up without the shadow device in place. This is done by pressing the shutter button half way until the lens focuses at infinity. The shadow device is then placed between the Sun and the lens and the shutter button is pressed all the way.
THE SHADOW OF THE EARTH
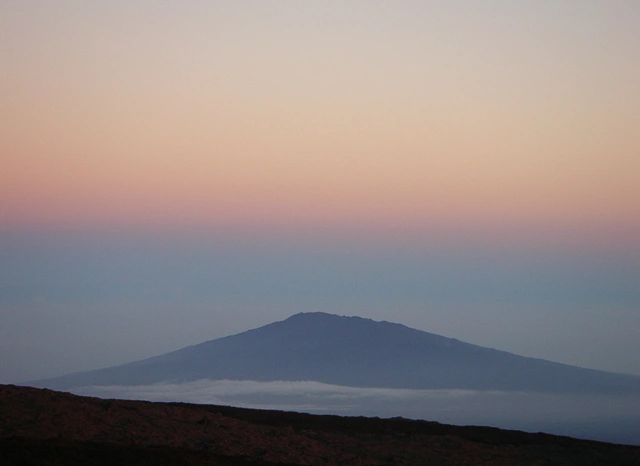
The antitwilightglow appears in the sky over the horizon opposite sunrise and sunset. In the image below, the pink arc over the horizon is light from the sun illuminating the atmosphere. The dark region between the horizon and the pink arc is the shadow of the earth. This photograph was made just before sunrise from Hawaii's Mauna Loa Observatory (elevation 3,400 m). The mountain is Hualalai (elevation 2,521 m), an inactive volcano that dominates the sykline at Kailua-Kona.
The two images below are from the upper half of a fisheye (186-degree) photograph. The white object is the moon. The second photo includes a white arc to illustrate the curve of the earth's shadow. This curve plainly illustrates the curvature of the earth, a phenomenon that was clearly visible to ancient people. The curvature of the earth is also obvious when the moon is observed during a lunar eclipse.


The image below is a full fisheye photograph looking straight up at the zenith. The sunset is at upper left, and the antitwilight glow and the earth's shadow are at lower right. This photo was made less than one minute after the photo above. Note that the road and the moon are visible in both photos.

The photographs on this site are copyright by Forrest M. Mims III and may not be used
for commercial purposes or on other web sites without permission. 


